Note that the bridge to STELLAR is for Trade History only.
If the PC is already running STELLAR platform, then you simply have to set up a new connection in connection manager. If setting up on a different PC, then see the instructions below for setting up the STELLAR VPN client
STELLAR Connections are defined as follows:
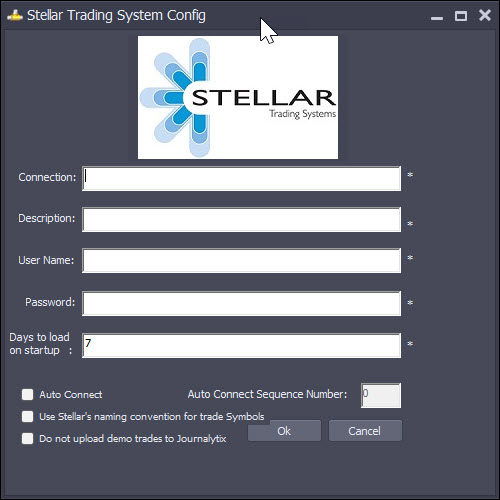
Connection: The name of the connection - just something you'll remember it by.
Description: Optional - an additional description for the connection.
User Name: The user name for this STELLAR Account.
Password: The password for this STELLAR Account.
Days to load on startup: Number of days trade history to download when connecting - note up to 365 days history is now available. This may take a while to download as we throttled the requests to prevent thrashing Stellar servers. This download is a one time thing - after first load, it'll pick up from where it left off last time.
Auto Connect: Check if you want this connection to connect automatically on start up
Auto Connect Sequence Number: The order of connection. If you have more than one connection that will connect on startup, you can specify which one you want to connect first.
Use Stellar's naming convention for trade Symbols: Check this box if you want to use Stellar's naming for trade symbols
Do not upload demo trades to Journalytix: Check this box if you do not want your demo trades to be uploaded to Journalytix
If STELLAR is not installed on the PC:
Install VPN client & test connectivity
Download the VPN client: https://www.dropbox.com/s/ntn70x7r85lfryi/anyconnect-win-4.1.04011-pre-deploy-k9.msi
Please use the following connection URL and credentials in the Cisco VPN client:
Connection URL https://5.148.61.114/dev
Username username provided for VPN by stellar
Password password provided for VPN by stellar
Set environment variables
In windows explorer, right click on "This PC" and select "Properties"
Select "Advanced System Settings"
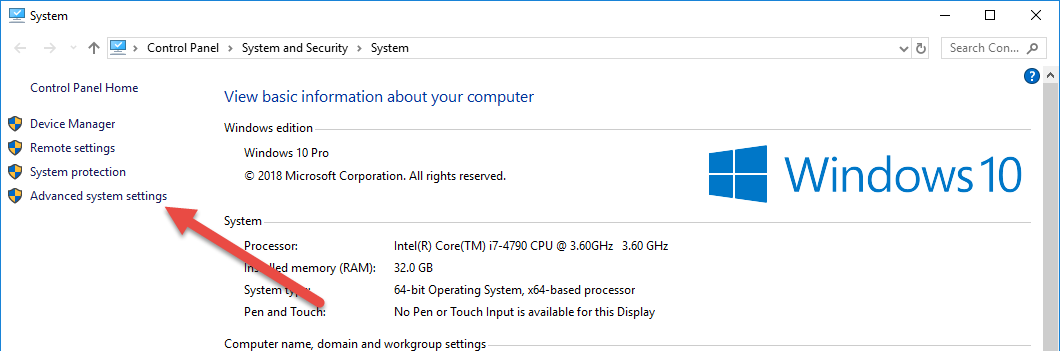
Click on "Environment Variables:

Click on "New" in System Variables Section:

Add 3 new name/value pairs like this:
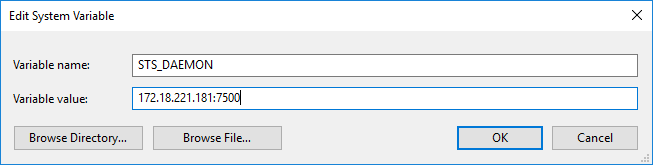
The 3 pairs you need to set up are
Name: STS_DAEMON Value: 172.18.221.181:7500
Name: STS_NETWORK Value: 172.16.215;239.192.1.0
Name: STS_SERVICE Value: 7700
Install TIBCO
Download and run the Tibco installer: ftp://stellarftp.stellartradingsystems.com:stellar123@ftp.stellartradingsystems.com/Tibco/Windows/64-bit/Stellar-Tibco-8.4.5-6.x86_64.exe